Monday, December 13, 2010

Music Chimes


You may love someone enough to make this for them as a gift.  Apparently, the only person I love this much is me, because I'm the only person I've ever made these for.  Or plan to.


Instructions for these chimes have been broken up into 4 different posts, so you'll have to go back to my main blog page and scroll down.  Or, you can do it the easy way, and click on the "Chimes" label at the bottom of this post.


These really are great for anyone who deals with children or teenagers in a musical setting (for me, that's at church).


They're relatively cheap inexpensive to make, and are tons of fun.  Plus, if you don't wear work gloves when you're making them you get free blisters. 


Wednesday, December 8, 2010

Music Chimes, Part 4

Pictures should be self-explanatory.  If not, send me an e-mail.  (I'll post the size of the "holders" I sewed later - they're out in the car and it's 25 degrees outside right now.  SO not going out there to get them).


Friday, December 3, 2010

Music Chimes, Part 3

Cutting Directions:


Rule No. 1:  YOU HAVE TO BE ABSOLUTELY PRECISE WHEN CUTTING CHIMES

Rule No. 2: See Rule No. 1


Rule No. 3:  Measure each pipe individually, then cut it before measuring adjacent pipe length.


Measuring and cutting:


1) Measure and using a fine-tipped marker, mark the precise cutting length of one pipe at a time, beginning with #2.  Cut EXACTLY.

2) 1st 10-ft. pipe length you will cut as follows:


Chime no. 2, note B, 13";
Chime no. 3, middle C, 12-5/8";
Chime no. 4, C#, 12-1/4";
Chime no. 5, D, 11-7/8";
Chime no. 6, E flat, 11-1/2";
Chime no. 7, E, 1-1/4";
Chime no. 8, F, 10-7/8";
Chime no. 9, F#, 10-5/8";
Chime no. 10, G, 10-1/4";
Chime no. 18, E flat, 8-1/8";
Chime no. 19, E, 7-7/8";


on the next 10-ft length:
Chime no. 1, B flat, 13-3/8";
Chime no. 11, A flat, 9-7/8";
Chime no. 12, A, 9-5/8";
Chime no. 13, B flat, 9-3/8";
Chime no. 14, B, 9-1/8";
Chime no. 15, C, 8-7/8";
Chime no. 16, C#, 8-5/8";
Chime no. 17, D, 8-3/8"


Did I mention that they have to be cut EXACT?????


3) After cutting each pipe, number each one with a label of masking tape to keep them straight until you finish cutting and label them permanently.


4) Measure down 2" from top of each pipe and mark for drill hole.  Use a drill press (or some device to securely hold each pipe) and drill a 1/8" hole exactly straight through both walls of the pipe.  File off any burrs that remain inside or outside of drill holes so they will not alter the pitch of the pipe.


5) Thread 14" piece of plastic cording through each drilled pipe hole and tie in a secure square knot.  Do not trim ends yet as you may wish to adjust length so all pipes hang an equal distance from the top if stored in the wooden frame.


6) To label each pipe, use a permanent black marker.


7) 1" up from the bottom end, mark the pipe numeral 1" high (longest = #1, B flat, shortest = #19, E).  4" above this, write the letter name in capitals, adding sharps or flats as indicated.


8) Mallets are made by cutting each dowel into 9" lengths, then gluing one end into a macrame bead with Tacky glue.  Make sure the bead hole is snug enough to keep the dowel from slipping clear through.


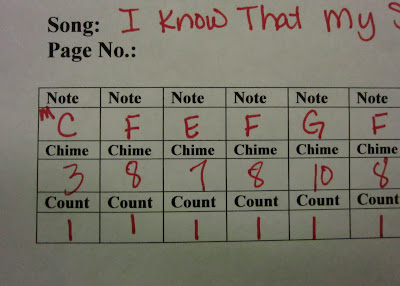
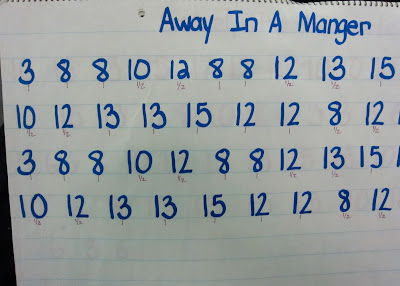
Pictures of chimes to follow.  As well as charts showing which chimes to use for what songs. 


These are such a pain to make, but they are SO MUCH FUN in Primary.  That's why I don't pull them out very often - it keeps their interest that way.

Thursday, December 2, 2010

Music Chimes, Part 2

Before I begin, let me give credit for these instructions where credit belongs.  You didn't actually think I was smart enough to figure this out, did you?


Years and years ago, before the days of internet, blogging and all things wonderful in the world of technology, we had to rely on the U.S Post Office to bring ideas to us.  Therefore, at that time, I subscribed to an "idea" periodical, called "The Grapevine".  I have tried to Google it, so I could just send you to the site for these instructions, therefore, giving proper credit where proper credit is due.  However, no-could-find-it, so this is as close as I could get to giving said proper credit.


That being said....

You will be making: 

19 chimes 

and 

as many mallets as you think you'll need (12-16 is preferred for group use).  

Most materials are available at hardware (Lowe's, Lowe's - did I mention Lowe's?), variety or craft stores.

You will need to purchase:


1) 20 ft. of 1/2" (inside diameter) thin-walled EMT (Electrical Mechanical Tubing).  It's usually sold in 10 ft lengths.  There will be approximately 3 1/2" remnant of pipe left over (good for one lower-pitched pipe).


2) Copper tubing pipe cutter, which will accommodate 3/4" pipe (makes cutting easier and more precise).


3) 22 ft. plastic cording to make 19 hanging loops of 14" length (however, I just use fishing line);


4) 30-mm round wooden macrame' beads with 5/16" diameter hole to just accommodate dowel.


5) 36" wooden dowels 5/16" diameter (should fit snugly inside hole of wooden macrame' bead, check bead hole size first before deciding on diameter of dowel).


Cutting instructions to follow on next post.

Wednesday, December 1, 2010

Music Chimes, Part 1

If you are connected with music in any way, you will want to make these. Trust me on this.


However, know this:


Before you begin you will thank me for this.


Before you're through, you will cuss me for this.


After you finish, and you use these with your particular group of children in a musical setting, then and only then, will you love me.


I will be breaking these instructions up into several posts. Because it's 11:00 p.m. and I have to get up and go to work in the morning.


So this post will only consist of telling you what you'll be making.

Brace yourself.


(P.S. - better pictures will follow, I promise)